

Constructing Architectural
Models
A Tutorial
By David Easton
Copyright©2013DavidEaston
CONTENTS
1.
Model Making Materials and
Tools
2.
A Simple Model House
3.
Brickwork
4.
Stone Walls
5.
Windows and Doors
6.
Roofing
7.
Timber
8.
Special Shapes
9.
Topography
10.
Trees
Introduction
I have been a commercial model maker for some 25
years largely serving the construction industry. I developed many of my skills prior to that time when
constructing model buildings as a hobby and these methods have stood me in good
stead.
Laser cutting and 3D printing now offers the
opportunity for highly accurate and detailed preparation of components or of
complete models. My personal preference
is still for the “look and feel” of a model built entirely by hand.
I hope that these tutorials will help those
budding model makers who wish to try their hand with these methods.
I quote a number of U.K.based suppliers and
materials. Readers from other parts of
the world will find similar products in their own countries or may be able to
order stock by mail order from the companies that I quote, all of whom may be
found on the internet.

1. Model Making Materials
The principal material
from which I build models is polystyrene sheet. I first discovered this
medium back in the 1960's when I watched a demonstration by George
Slater, founder of Slater's Plastikard. This was a wonder material at the time
and George was able to make the sort of models that one could only dream of.
The solvent which gave a quick, clean bond was a revelation too. It carried
warnings against breathing its' fumes and about its' flammability. George was
usually to be seen hovering over the open bottle, cigarette dangling from his
mouth! I had to try this Plastikard so I bought an introductory pack and
have used nothing else since.
My local model shop supplies an alternative product as do various dealers who can be found on the Internet. A wide variety of strip plastic is available in the form of tubes, rods, square and rectangular sections.
My preferred solvent is " Plastic Weld" from E M A Models. Methyl Ethyl Ketone (MEK) can be ordered in larger quantities from pharmacists or online. It is considerably cheaper although perhaps not giving such a strong join.
I usually obtain scenic materials such as foliage and grass scatter from retail outlets as this allows me to compare colours.
Model making supplies are available from online suppliers. The catalogues of 4D Model Shop and E.M.A. Model Supplies offer a huge range of materials and accessories. The model railway market although having many products, rarely offers goods to a convenient scale for the commercial model maker.
Etched metal components are invaluable for fencing and railings. These come in a variety of scales and styles and are of very high quality. A good model shop may offer a selection. The suppliers listed above will offer a very wide choice. Chain link fencing and close mesh can be represented by using screen printing mesh. This can be sourced on the internet or from a local screen print supplier and is available in a variety of mesh sizes. It is inexpensive and a square metre will last a lifetime. It is manufactured from PET and is easily painted or stained.
Tools
I have quite a small tool box
and carry out most of
my work using just a few essentials.
I
use steel rules of 150mm and 300mm length which are marked with clear, easy to
read graduations.
I
would never be without my Swann-Morton scalpel. I use a No3 handle and 10a blades. They are inexpensive and the
handle will last a lifetime. There is no better modelling knife available.
A
try-square is essential. Your work must be precise and those corners, exactly
90 degrees. Some cheap plastic set-squares are also handy as is a protractor.
A
good quality pair of compasses with an option of needle sharp points on both
arms will scribe an accurate curve or circle.
A
junior hacksaw or a small fine toothed hand saw can be invaluable at times.
A
good selection of drill bits from the smallest sizes upwards. Have a good
number for they break easily. I use an
old hand brace which gives great control and a pin chuck for the smallest
drills. A model makers power drill with variable speed control is handy. If I
am drilling into plastic, I will often twist the drill between my fingers for
the greatest accuracy.
Other
useful items include pliers, small screwdrivers, french curves, sandpaper and
emery paper and lots of paint brushes.

2. How to build a Simple Model House

I am going to construct, from plastikard, a small building at 1:200 scale, finished in white. This model will have minimal detail as for a building included for context purposes in a larger scheme.
For a context model at this scale I will use 0.5mm plastikard as this is easily cut and quick to work with. For a larger scale I would use 1mm thickness for extra stability. Always check that the plastic sheet is square and trim if necessary.

I will first measure and cut out the outer walls. At this scale a floor to eaves height of 5 metres will be modelled at 25mm. I shall give the roof a 35 degree pitch.

I will cut out the doors and windows from the front elevation although these will be blocked out from behind to maintain an all white finish. These can be easily pushed out from behind; a residue of plastic will need to be trimmed.

Bond small pieces of plastic
behind each window and door to block them out.

They will remain visible in
relief.

I will assemble the walls with butt joints as these can be scraped to remove evidence of a join. Were I to face the walls with a brick or stone finish, I would chamfer the edges to conceal the join.

I always assemble buildings around a floor plate which ensures that they remain rigid and square. For the same reason, I fit a false ceiling at eaves level. If the windows were to be clear glazed, I would install all floors as well as a representation of internal walls. This avoids a view through the building as well as adding stability to the model.

When the building has been assembled scrape the joints
with the edge of the scalpel blade to clean up the edges.

The roof will be assembled from a similar gauge of
plastikard. Chamfer the edges where they will meet at the ridge to give a
clean sharp join.


For a model of this size and
design, you may bond the two roof halves before attaching them to the building.

Chamfer the edge of the
gabled roof where it meets the main roof panel to give a tidy join without
gaps.

The solvent might well leave
shiny marks on the surface of the plastic. These may be cleaned by scraping
with the edge of the scalpel blade, sanding or simply by spraying the model
with a matt white aerosol paint.
I have added a chimney stack. I could have included chimney pots, window cills, barge boards etc. but this is just a context model so such detail is not required.
If you would like to construct a more detailed model, follow this tutorial but adapt it to incorporate some of the other methods described on the website or PDF file.

3. How to model Brickwork
Realistic looking brickwork is not always easy to achieve. It is possible to obtain printed brick papers but these are limited in both scale and colour range. Embossed plastic sheet tends to have a mortar coarse which is too broad and too deep. I have used the following method for many years which although laborious is quite effective:
Before committing this method to a model try experimenting until you are satisfied with the results.
For this demonstration, I have cut a piece of styrene sheet (plastikard) 0.75mm thick and will now cut a rectangle to form a window.

I cut 3 times into the plastic; don't apply too much pressure or the blade might snap and don’t try to cut right through. A residue of plastic will be forced up by the blade and this should be pared off.

The rectangle may now be pushed out from the reverse side. A residue of plastic will be left and this should be trimmed away.

Paper bonds well to styrene sheet and I will now apply some 75gsm paper to the section of wall. Brush the paper with solvent, a small area at a time and while wet, press it down lightly with your fingers.

Trim the paper to size. The paper covering the window opening should be cut top and bottom and down the centre and then wrapped around and bonded at the back.
I am going to represent 1:100 scale brickwork and will require brick courses 0.75mm apart. These courses are lightly cut into the paper surface. I will measure and mark the edge of the paper at 3mm intervals and make parallel cuts across the section of wall.

I will gauge by eye, the position of the remaining courses. To give a little relief I will scribe a brick lintel above the window with vertical cuts.
We will tint the paper with water colours. A variety of colours may be mixed to match any brick colour. The most useful shades are "light red" for red brick; "yellow ochre" for buffs and "paynes grey" for greys and blues and of course "white" for mixing. Using a fairly large soft brush, wet the paper with clean water; this will help even distribution of the paint.


As a finishing touch, I have added a narrow strip of plastic to form a window cill and painted this in a stone colour.
This method is also suitable for 1:200 scale brick although it is not easy to scribe the paper closer than 0.5mm.
When modelling 1:50 scale, I will sometimes use the above method although I prefer to paint the mortar courses with white ink. Colour the paper bonded walls as above and when dry measure 3mm intervals. Using a bow or technical pen filled with white or pale grey ink, rule the horizontal courses at 1.5mm spacing. Similarly draw the vertical mortar lines 4.5mm apart. Any errors can be removed with a lightly moistened brush. Again, highlight individual bricks. This is a very time consuming method but the result cannot be bettered.


4. How to model Stone Walls
Embossed
plastic sheet is produced by Slater's Plastikard and other suppliers to
represent random or dressed stone walling. This will suit most purposes
especially at scales such as 1 : 100 or 1 : 200. This is usually quite a thin
material and will need bonding to a backing sheet to provide stability.
More precise detail is sometimes required especially if a building features large quoins, lintels or other features. My method although time consuming is very effective.
Prepare sections of walling and bond paper to this using plastic solvent and trim any excess.
More precise detail is sometimes required especially if a building features large quoins, lintels or other features. My method although time consuming is very effective.
Prepare sections of walling and bond paper to this using plastic solvent and trim any excess.

Paint will key more readily to paper than to plastic. Give the paper a water colour wash of a mortar shade (weathered grey or buff).

Individual stone blocks will be painted onto this surface using acrylic paints. Study the stone which you are replicating and establish which colours are represented. Mix acrylic paint to the required shade. You might well need to use browns, yellows and greens as well as grey. Use a brush which is no wider than the courses of stonework and trim this to a square rather than pointed end.

Start by painting any quoin stones and continue these "around the corner" onto the adjacent section of wall. Next, paint lintels or any other large featured blocks.

Paint should be applied thickly to give as much relief as possible. Infill the remaining areas of wall stone by stone. Paint the stones in slightly varying shades as a real stone wall is rarely of a uniform colour

When dry, I shall paint over some of the stones to increase their depth. I may also give the entire wall a thin wash of colour to tone down the contrast between stone and mortar.
With a little practice, this work progresses quite quickly.
Acrylic paint dries quickly so don't mix too much at a time. A retarder may be added to slow down drying time. An acrylic modelling paste will thicken the paint (a cornflour/water mix may also work).

5. How to model Windows and Doors
There
are several ways to model windows and the choice to some extent depends upon
scale. At the smallest scales it is usually sufficient to scribe the
surface of some clear plastic to represent glazing bars and using a piece of
tissue to rub in some acrylic paint. The surplus paint can easily be removed.


A similar method suitable for 1:100 or 1:200 scales is to draw the glazing bars using pen and ink. This is quite effective but does not give any relief.


- My preferred method is to cut out the window panes from 0.25mm sheet plastic. With care a very fine glazing bar can be produced An outer frame is then bonded to this to build up the relief. If the windows are of any colour other than white, the should be painted at this stage before they are glued to the clear glazing material. Few clear plastic sheets will bond using modelling solvent. Be very careful if using super glue as this is likely to cloud the "glass". A clear adhesive such as UHU is the safest option.


Doors are similarly built up in layers of sheet plastic. Firstly, cut out a door frame; next cut out any panels from the door and finally attach this to a backing sheet or in the case of glazed panels, to clear plastic. Fittings such as handles and letter boxes can safely be omitted below 1 : 50 scale as they are unlikely to be noticed.

6. How to model Roofing
My method of representing roofing is quite simple. I lay overlapping strips of paper, coloured with water colour paint on to a pre-formed plastikard roof. Normally I would fit the roof to the building before adding the tiling strips. For the purpose of this demonstration however, I am preparing just a simple piece of roofing.

Mix some quite thin water colour paint. "Paynes grey" a dark shade with a hint of blue is a perfect for Welsh slate. Add a little green or red for other quarries. "Light red" is a good colour for most tiles; add colours such as "yellow ochre", "burnt sienna" and white to obtain differing shades.

Take a sheet of 80 - 100 gsm paper and using a large brush apply a wash of colour. Paint across the width of the paper allowing any brush marks to remain. Lay the paper flat until it is dry and then repeat until the required density of colour is achieved. The colour should be strong enough to complete this in two applications. The paper will probably "cockle" at the sides and this area should be trimmed off
.

Tiles and slates vary in size and the spacing on the model will reflect this. For 1 : 100 scale, I usually trim the paper into 5mm wide strips cut across the brushstroke. I allow a 50% overlap when bonding the paper to the roof.

Mark the roof with parallel pencil lines as a guide. Bond a strip of paper using solvent and press lightly to hold into place. Position the next strip 2.5mm above and similarly bond into position.

Repeat this until the entire roof is covered. For the ridge tiles,
lightly scribe a strip of paper down the centre and using a suitable paper
adhesive such as PVA, position this along the length of the ridge.


Moulded tiles such as pantiles must be tackled differently. Embossed plastic is available for some styles and scales and might suit. For small scale models, plastic moulded to represent corrugated sheet can be adapted for roofing by cutting lightly across the corrugations to represent rows of tiles.

7. How to model timber
Make
no mistake, there is no better way to model timber than to use real wood.
I have quite frequently used timber as a feature of a model and for this purpose balsa, obechi and various veneers have been worked. Veneer, being available in a wide variety of woods and being easy to cut is particularly useful as a facing material especially on a larger scale of model.
This 1 : 50 scale reception area model uses mahogany veneer to face the desk, columns and door frames.

Some features, especially at smaller scales are not easy to model in wood and I often prefer to use white plastikard which is then given a timber finish. This sports hall has a wooden floor and wood faced furnishings and doors.


The floor, constructed from plastikard was first scribed to represent planking. Using a soft brush, it was the painted with a spirit wood stain. The stain has solvent properties and slightly softens the surface of the plastic. The brush drags a little giving a wood grain effect. This operation must be completed in one stroke as an attempt to paint over wet stain will give a messy result. It is possible to apply a second coat once the first has dried. Experiment first with scrap materials until satisfied with the results. If all else fails, most of the stain can be scraped or sanded from the surface of the plastic allowing one to try again. If ll is well, you will achieve an excellent representation of timber.

8 . How to model Special Shapes
Plastikard is a very versatile material that allows one to create difficult and complex shapes.
Cutting a circle is quite simple. Take a pair of dividers or compasses with fine points. Measure the required radius and scribe the surface of the plastic to mark the circumference. Scribe only to a depth sufficient to give a guide to the tip of the scalpel. Cut into the scribed line with the scalpel to about a third of the thickness of the plastic. You will now be able to push the disc out from the back. A rough edge may be left which will need a little trimming.
If you require a dome, you may find a ready moulded component from a model supplier. You will be lucky however, if this is to the size or profile that you require. Usually, I have to resort to shaping my own domes. From a sheet of 1.5mm plastic, cut discs by the method above. For a dome 15mm high, cut 10 discs each diminishing a little in diameter. Using solvent, laminate these together and leave for an hour to allow the bond to strengthen. You will be able to cut away some of the excess plastic using the blade of the scalpel. It will however, be necessary to scrape with the edge of the blade to achieve the final profile. Finish off with sandpaper and then give a wash of solvent to give a smooth finish.
The above method is used for a variety of complex shapes. Plastikard may be cut, scraped, drilled, filed and sanded. Grinding or turning is not successful as the resulting heat melts the material.
Rods, tubes and rectangular sections are available commercially in a wide choice of sizes. These do not always meet ones specifications and again may be profiled by hand. As with domes, cut strips of plastikard to the width of the required section and laminate together with solvent. Scrape longitudinally with a scalpel to form the correct profile. Finish with sandpaper and finally with solvent.
Thinner plastikard 0.5mm or 0.25mm can be rolled around a tube and will retain its' shape. Pre-form curves in this way otherwise the material may crack when solvent is applied.
It is also possible to shape plastikard by applying heat. A hot air gun or boiling water will permanently mould the plastic. This method is most effective if the plastic is first taped to a former. Dip it in boiling water for 5 - 10 seconds and then run it under cold water. The material will retain its' shape. Be prepared for disasters ! By trial and error you will have success.
Modelling with plastic sheet does not of course meet every requirement and a variety of materials may need to be used. Milliput modelling clay is easily shaped by hand and will dry to a very hard finish. Dental putty, which "goes off" very quickly can likewise be shaped by hand. When set, it is fairly soft and can easily be cut to shape. It can also create a re-usable mould for casting plaster shapes.

9. How to model Topography
A particularly difficult topic for many is the accurate modelling of topography.
Follow these guidelines and it will be quite straightforward.
Firstly, gather as much information as possible. If a survey has been made of the area to be modelled, you will have all the data required. Large scale Ordnance Survey maps will give a number of spot heights especially along roadways and topographical maps will provide contours.
You will no doubt be modelling a defined area and you should first establish the lowest point within that space. This can be your datum point representing an altitude of zero. Plot as many additional points as you may require. Do this to scale for this is how you will be working. If your model is to a scale of 1:200, a metre will be modelled as 5mm. Plot a point 1 metre above your datum as +5. Mark these plots both on the model base and on a site plan.
Start modelling with roadways. I usually make these with 1.5mm thick card with a 0.5mm layer of grey card on top. Position vertical pieces of card which should be the height of your plot less the 2mm thickness of the roadway. Repeat this for any other areas of level or uniformly sloping land such as car parks, lawns etc. In the same way, create a base for any buildings. This should be a flat and uniform "foundation". Any variations in levels around the building should be added later.


These photos show how levels
are built up using a card framework and infilled with plaster or filler.
Next, if required, add water. Rivers, canals, and ponds can be difficult to represent realistically. Again, plot the level above your datum and make a card platform for support. Water will need depth; if your model is 1:200 scale, this might need to be 5mm. Calculate the height above water of the banking. Your platform therefore should be of a height to allow for both. The banks will only be vertical if your model is of a formal pool in which case they can be made from card or plastic sheet. Rivers, canals or lakes will have sloping banks and these can be formed with quick drying plaster or filler. The bed may now be painted. This will only be blue if a pond is lined with coloured tiles. Still water will be a murky colour; use browns, greys and greens with the darkest colours where the water is deepest. Fast flowing water will be clear and will show the river bed which may be a variety of colours depending upon the locality.
Do not fill with "water" until the rest of your topography is complete.
Water may be represented by acrylic varnish which is ideal if only a shallow trickle is required. For deeper water use clear casting resin or a water modelling medium available from model shops. Resin dries slowly unless it is built up in layers. Sheet perspex may be used for still, formal pools or for an “architectural” finish. The model illustrated below is of a dockside development and the water is given a blue finish. Translucent coloured acrylic is available although in this instance, not in the desired shade. Blue card was laid on the bed of the dock and covered with 5mm thick clear acrylic to give sufficient depth.

Your model base will now require completion of the remaining areas. Any land which is level or of a uniform slope may be filled in with flat card. Irregular topography can be formed from expanded polystyrene block cut to shape with a fine saw. Depths may be checked by inserting a thin probe such as a long needle into the landscape. These areas should now be finished with a covering of plaster or filler 2 or 3 mm deep. Have some clean water to hand and be prepared to use your fingers to achieve a smooth finish. When the plaster is thoroughly dry, tidy up any rough areas with fine sandpaper. The ground should be painted a light shade of dry earth colour. Remember that soil colours vary from place to place.
Model shops and suppliers offer ranges of ground cover materials in various shades which may be used to simulate grass. Paint the soil with a slightly thinned coat of PVA adhesive. Work on a small area as the glue will dry quickly. Sprinkle on, the grass cover. I use an old tea strainer to ensure an even distribution. Lightly pat it down with your fingers or preferably a small piece of sponge or cloth to ensure adhesion. When the glue is dry turn the model over and shake off any loose grass. Blow, tap, or even vacuum to remove any further excess.
Return now to those rivers and lakes and fill with the water medium and leave the model undisturbed until all is dry.
Finally add trees, shrubs and any other foliage that may be required.
MATERIALS
For that 1.5mm card, I use artists mount board. Your local picture framer will have lots of offcuts which he will be pleased to sell for a fraction of the usual cost. Mount board comes in a variety of colours but is always white on the reverse side. The thinner card which I use for road surfaces and footpaths comes from W.H.Smith's larger branches. It is available in both white and grey and a large sheet costs less than £1.
Buy PVA and filler from a poundshop as quality is not important for this purpose and you may need a fair quantity.
Scenic materials such as grass scatter can be found in your local model shop or by mail order from a variety of suppliers. I find that Hobbycraft stocks a good selection.

10. How to model Trees
If you have a generous budget or only require a few trees, you may well find that commercially made products suit your needs. If you need a forest or even a modest sized copse it will be more economical to make your own.
Here is one of my methods for making deciduous trees.
You will require : A length of electric cable - the type that contains multiple fine strands
Some paper clips or similar stout wire
Commercial foliage material, either loose,
in clumps, or in mats.
Clear adhesive
Superglue
Matt grey spray paint
Acrylic paints to mix
For some background information on common British trees visit http://www.british-trees.com/
The following method is suitable for scales between 1 : 500 and 1 : 100. For this example we will make a 1 : 200 scale deciduous tree, 20 metres high resulting in model 100mm tall. This would of course serve as a 10 metre tree at 1 : 100 scale.

1.
Strip the electric cable of all insulating material. Cut some strands to
a length of 120mm. You will probably need at least 50 strands in total. This
number can be adjusted to reflect the thickness of the trunk and density of the
branches.

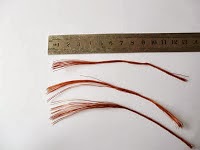
2. Straighten a paperclip.
3. Leaving about 40mm showing, wrap the wires around the paperclip and twist tightly along its' length to form a trunk. Slightly splay some of the wires at the bottom of the trunk to represent exposed roots. Apply a drop of superglue where wire and paperclip meet to hold everything together.

From a point about 30mm from the bottom of the trunk, divide the strands of wire into 3 or 4 bunches. Twist these bunches for about 15 - 20mm of their length and again divide each into 3 further bunches.

Repeat this process until only single strands remain which will need to be splayed out. You will now have the skeleton of a tree. Trim this into its' final shape with scissors.

4. Spray the tree with a matt grey paint. A cheap undercoat or primer will be suitable.
5. Observing most tree species, you will find that bark is coloured varying shades of grey, sometimes with a hint of green or brown.
The wire trunk and branches of your tree will need to be disguised. A liberal coating of acrylic paint will achieve this and effectively represent bark. You will not need artist quality paints and those products sold at poundstores or "The Works" are ideal. Mix a quantity of white paint with a variety of colours such as black, green, brown, yellow until a suitable colour is found. Use a fairly soft brush and apply generously. Acrylic dries quickly and an extra application may be needed to cover any wires still evident.

6. Commercial foliage materials such as those manufactured by Woodland Scenics come in a variety of shades and may be in clumps or mats both of which should be teased out to give a "lacy" appearance

A small amount of clear adhesive applied to the ends of the tree branches will be sufficient to glue the foliage to the tree. Starting with the lower branches build this up in small areas so that the foliage has a layered appearance, replicating look of a real tree.

Add foliage to the end of each branch with additional clumps along the length of each branch.
The finished tree is flexible and should be re-shaped as required.
7. In order to avoid shedding "leaves" spray with a hair lacquer to hold everything in place.
The protruding wire should be trimmed as required and used to "plant" the tree in the model base.
Whilst this is a fairly time consuming method of producing trees, with practice the process becomes quite speedy especially if each stage is handled in batches.
At
a smaller scale, a tree might be represented by no more than a clump of foliage on a trunk. Make the trunk from wire or a paper clip and
again paint it with acrylic to give it a textured finish. Attach a clump of
foliage material using clear adhesive and shape it to represent a particular
tree species. If an area of woodland is
being modelled at a small scale, it is possible to economise on the number of
trees. “Plant” them more sparsely and fill in any gaps with loose foliage
material to create a dense canopy.
It
is easy to produce your own foliage material.
Use upholstery foam or domestic sponges,
choosing white or cream coloured foam.
Roughly break this up and place a small amount in a kitchen blender
until no more than a third full. Top up with water and using small bursts of
power, mince the foam until it is reduced to pieces of 2 – 3 mm in size. The foam will not be chopped unless it is
carried in water. Take care that the blender does not overheat.
Squeeze
out most of the water and place in a bucket.
Repeat this until you have sufficient for your needs.
The
foam will now be coloured using fabric dyes.
I have used the Dylon range (hand use) which has a dark green suitable
for coniferous tree foliage. For
deciduous trees there is not a natural shade so I mix yellow and navy blue; try
a 2 to 1 ratio. A variety of shades
might be needed and these will be found by trial and error. Dye the foam according to the maker’s
instructions, squeeze out any surplus liquid and spread the foam on newspaper
to dry out.
-------------------------------------------------------------------------------------------------------------
The
models below were constructed using the methods described in this tutorial


The 1 : 50 scale model illustrated above was built
entirely by the methods of this tutorial.
The
base, of plastic, has paper bonded to the surface and block paving scribed into
the surface. The area behind the pool is a commercial scatter material representing
gravel. Brickwork is prepared as
described using white ink. The roofing includes feature tiling cut by hand from
paper. Details such as columns finials
and balusters were all hand formed, mostly from solid plastic rod. This was not
as laborious as it may seem. The bench
is made from fine wire bonded with super glue.
Only the woman on the bench is a commercial product.
5 comments:
Thanks for the tutorial David. I made some great bricks using sandpaper a few months back.
Nice Content
Thanks for sharing on Architecture Modeling
Architecture Modeling in UK
THANKS FOR SHARING SUCH A AMAZING CONTENT
GREAT PIECE OF WORK!!!
REALLY APPRECIATE YOUR WORK!!!
MEP F modelling
We appreciate your dedication to providing insightful and thought-provoking information. Your commitment is commendable.
desk top drafting table
Great post! An art table with storage for adults is a perfect solution for keeping creative spaces organized and functional. I love how it combines ample workspace with convenient storage for supplies and tools. This type of table truly enhances productivity, comfort, and creativity for artists, crafters, and hobbyists alike.
art table with storage for adults
Post a Comment